

Next: Period Cross Correlation
Up: Map Generation
Previous: Map Generation
A students t-Test is a statistic for measuring the significance of
a difference of means between two distributions[7].
In conventional fMRI, the intensity of each voxel in an image is
recorded temporally, a plot of which is referred to as its time course.
During the experiment there are control (cntl) and stimulation (stim) periods.
It is the set of intensity values during these periods that make up the
distributions for the t-Test.
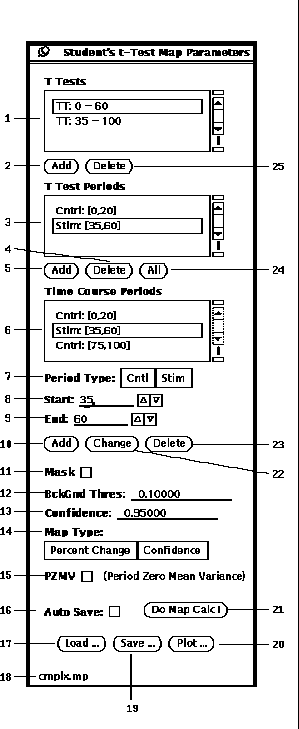
The t-Test parameter popup window is shown in Figure 20.

Figure 20: Student's t Test parameter popup window.
-
The first step in calculating a t-Test map is to populate the
Time Course Periods list (20-6).
This is accomplished by
entering a Period Type (20-7),
Start time (20-8),
End time (20-9),
and then pressing Add (20-10).
The Change (20-22)
and Delete (20-23) buttons can be
used for editing the currently
selected period from the list (20-6).
-
Then create a t-Test by pressing the
Add button (20-2), which will
make an entry in the T Tests list (20-1).
Next an association must be made between particular periods
to the currently selected t-Test.
This is accomplished by selecting a period from list (20-6)
and pressing the Add button (20-5).
Or simply press the All
button (20-24) to associate all the periods.
The Delete button (20-4)
can be used to remove an association. This procedure can be repeated
if multiple t-tests are desired.
-
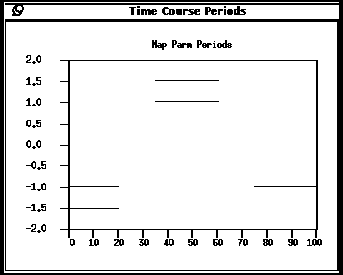
A graph of the time course periods can be displayed by pressing
the Plot button (20-20).
As shown in Figure 21, the lines at
1.0 show stimulation periods and the lines at -1.0 show control periods.
Those periods which are associated to the currently selected t-Test
have a second line at 1.5 and -1.5 for stimulation and control, respectively.
-
Next, one of two options can be specified to speed up the analysis
by limiting which pixels are evaluated.
If the Mask checkbox (20-11)
is selected, the BckGnd Thres (20-12)
is ignored and only those pixel
locations with non-zero values in the currently loaded mask are evaluated.
When the Mask option is not selected, then those pixels, whose cntl period
mean value is below the BckGnd Thres value, are not evaluated.
-
Then specify the t-Test Confidence threshold (20-13).
Only those pixels whose t-test result is above this
threshold will pass and have non-zero map values.
A value of zero is used in the map at pixel locations that are not evaluated
or whose t-Test confidence value is less than the threshold.
For multiple t-Tests, a pixels time course will be considered
to have failed if it does not pass all of the specified t-Tests.
-
There are two Map Type (20-14) options
which determine the non-zero values in the map.
The Confidence option simply uses
the t-Test confidence values. The Percent Change option calculates
the ratio of the average intensity change between the control and stimulation
periods as given in Equation 4.

-
The PZMV (20-15) option
stands for ``Period Zero Mean Variance.''
and is useful when there exists a baseline drift in the time course and
at least one distribution consists of more than one period.
With the PZMV option, the calculation of the
distribution variance is based on data where
the period mean is subtracted from each point
within its respective period.
-
Prior to calculating the t-Test map, the parameters must be saved to
a file. Pressing the Save button (20-19)
will popup the file browser (See Section 5).
After the parameters are saved, the name of
the file will appear in the lower left hand corner (20-18).
When any parameter is changed the file name disappears since it is no longer
consistent with the contents of the file. However, while a file name
is displayed, the AutoSave option (20-16) can be selected.
The AutoSave option will automatically save the parameters to the
current file.
The Load button (20-17) can be used to retrieve
previously saved parameters.
-
Having all the parameters and options set, pressing the
Do Map Calc button (20-21)
invokes the calculation of the functional
map. See Section 9.1
for the details on how to display the map.

Figure 21: Plot of t-Test periods.


Next: Period Cross Correlation
Up: Map Generation
Previous: Map Generation


